NumPy 기본 다지기

Numpy란 무엇인가?

Numpy_Symbol
Numpy는 상당부분 C언어로 작성된 파이썬 라이브러리이다. 기본적으로 array라는 자료를 생성하고 이를 바탕으로 색인, 처리, 연산 등을 하는 기능을 수행한다. 물론 C언어로 작성되었기 때문에 속도도 꽤나 빠른편이다.

Numpy의 기본

Numpy 불러오기


Numpy를 사용하기 위해서는 먼저 임포트시켜줘야 한다.

1
import numpy as np

위처럼 입력하면 Numpy의 임포트가 된다. 뒤의 as np를 빼고 나머지만 입력해도 되지만, 앞으로 사용할 코드에서 조금 더 편히 사용하기 위하여(그리고 관례적으로) as np를 작성해 준다.

Numpy배열 생성 및 둘러보기


Numpy는 기본적으로 array라는 자료구조를 사용하기때문에 배열을 생성하는 방법에 대해 먼저 알아두어야 한다.

1
2
3
4
arr1 = [1,2,3]
my_array1 = np.array(arr1)
print(my_array1)
print(my_array1.shape)

Output:

[1 2 3]
(3,)

위의 출력 중 첫째줄은 arr1의 배열을 그대로 my_arrary1로 가져와 출력한 것이고, 둘째 줄은 가져온 배열의 길이를 튜플로 나타낸 것이다. 값 뒤에 콤마(,)가 붙어있는 이유는 값이 하나만 존재할 때, 튜플은 값 뒤에 콤마가 있어야 하기 때문이다.


다음은 2차원 배열일떄의 예제이다.

1
2
3
4
my_array3 = np.array([[2,4,6],[8,10,12],[14,16,18],[20,22,24]])
print(my_array3)
print(my_array3.shape)
print(my_array3.dtype)

Output:

[[ 2  4  6]
 [ 8 10 12]
 [14 16 18]
[20 22 24]]
(4, 3)
int64

먼저 세개의 출력 중 첫번째로 my_array3의 값인 리스트들이 차례로 나열되며, 그 다음으로는 배열의 (행, 열)의 수, 마지막으로 배열내의 요소의 데이터타입을 출력한다.


마지막으로 3차원 배열일때의 예제이다.

1
2
my_array5 = np.array([[[1, 2], [3, 4],[5, 6]], [[5, 6], [7, 8], [9, 10]]])
my_array5.shape

Output:

(2, 3, 2)

세려는 양(또는 각각) 배열의 수가 대칭일때의 예제이다, 가장 바깥쪽의 배열부터 순서대로 배열의 수를 출력한다.
그렇다면 대칭이 아니라면 어떻게 출력될까? 다음을 살펴보자

1
2
my_array5 = np.array([[[1, 2], [3, 4], [5, 6, 7]], [[5, 6], [7, 8], [9, 10]]])
my_array5.shape

Output:

(2, 3)

출력과 동시에 에러(위 출력창에서는 삭제함)가 뜨는데 추측하기론 양쪽 배열이 대칭이 아니기에 양 배열의 길이가 같은 두번째 항목까지는 출력되나 2와 3으로 갈리는 마지막 항목에서 출력이 안되는것 같다.
확실하지않으니 참고만…

Numpy의 기본 함수들


Numpy는 여러 함수들을 사용할수 있다, 하지만 함수의 종류가 너무 많기 때문에 이 챕터에서는 기본적인 함수들만 알아보도록 한다.

  • arange


arange는 배열을 만들어주는 함수이다.
arange([시작],끝,[만큼 건너뜀])으로 작성 할 수 있으며 []안의 항목은 생략 할 수 있다.

1
2
arrange_array = np.arange(3, 13, 2)
arrange_array

Output:

array([ 3,  5,  7,  9, 11])

3부터 시작해서 12(13-1)까지 출력하며 2씩 건너뛰는 배열을 생성하는 arange예제이다.

  • zeros, ones


zerosones는 0또는 1로 초기화된 shape* 차원의 ndarray** 배열 객체를 반환한다.
두 함수 모두 객체 생성시 데이터 타입은 float64형식이다.


*shape : 행열의 차원
**ndarray : N차원의 배열객체. 기존파이썬과는 다르게 ndarray는 오직 같은 종류의 데이터만을 배열에 담을 수 있다.

1
2
3
4
zeros_array = np.zeros((3,2))
print(zeros_array)
print("Data Type is:", zeros_array.dtype)
print("Data Shape is:", zeros_array.shape)

Output:

[[0. 0.]
 [0. 0.]
 [0. 0.]]
Data Type is: float64
Data Shape is: (3, 2)

순서대로 배열, 데이터 타입, 데이터의 차원을 출력한다.


1
2
3
4
ones_array = np.ones((3,4), dtype='int32')
print(ones_array)
print("Data Type is:", ones_array.dtype)
print("Data Shape is:", ones_array.shape)

Output:

[[1 1 1 1]
 [1 1 1 1]
 [1 1 1 1]]
Data Type is: int32
Data Shape is: (3, 4)

같은 순서로 항목들을 출력했고 배열생성시 데이터 타입을 바꿀수 있음을 보여주는 예제이다.

  • reshape


reshape는 구조를 재배열해주는 함수이다. 배열명.reshape(차원, 차원)으로 사용할 수 있다.

1
2
3
4
# 위에서 만들어진 3 x 4 배열의 ones_array를 reshape하여 2 x 6로 재배열
after_reshape = ones_array.reshape(2,6)
print(after_reshape)
print("Data Shape is:", after_reshape.shape)

Output:

[[1 1 1 1 1 1]
 [1 1 1 1 1 1]]
Data Shape is: (2, 6)

reshape를 통해서 3x4 배열을 2x6으로 재배열 해준 가장 기본적인 예제이다.

재배열하려는 배열이 3x4 라면 3x4를 곱해서 나오는 값인 12의 인수들로 12의 결과가 나오는 배열((1,12), (2,6), (4,3))들로 바꿀 수 있으며, (2,2,3)등과 같은 3차원배열로도 재배열이 가능하다.

  • reshape의 값에 -1을 넣는다면?


그렇다면 reshape의 괄호 차원값에 -1을 넣는다면 어떻게될까?
다음 결과를 보자.

1
2
after_reshape2= ones_array.reshape(-1,6)
print(after_reshape2)

Output:

[[1 1 1 1 1 1]
 [1 1 1 1 1 1]]

-1을 작성한 곳에 12에서 나머지(두번째 값인 6)값을 보고 첫번째 값은 알아서 2로 지정이 된 것이다.


다음은 값이 -1 하나일 때의 예제이다.

1
2
after_reshape2= ones_array.reshape(-1)
print(after_reshape2)

Output:

[1 1 1 1 1 1 1 1 1 1 1 1]

결과와 같이 1차원 배열로 바뀐다. 하지만 (12)일뿐, 2차원 배열인 (1,12)과는 같지 않다.

Numpy 인덱싱과 슬라이딩


Numpy의 배열에도 값을 추출 할 수 있게 인덱싱과 슬라이딩이 가능하다.

1
2
3
4
my_array2 = np.arange(start=3,stop=30,step=3)
my_array2 = my_array2.reshape(3,3)

my_array2[1:3,:]

Output:

array([[12, 15, 18],
        [21, 24, 27]])

출력에서 첫번째 인자는 1에서 2(3-1)번째 까지의 배열을 출력하고, 두번째 인자인 :은 첫번째 인자에서 지목된 배열의 항목을 모두 출력하는 것이다.

Numpy 정렬


여러 값이 모여있는 array인 만큼 정렬도 가능하다. 이 챕터에서는 오름,내림차순으로 정렬해주는 sort(), 값이 낮은 순서대로 인덱스를 배정해 배열을 출력해주는 argsort()가 있다.

  • sort()


1
2
3
4
5
height_arr = np.array([174, 165, 180, 182, 168])
sorted_height_arr = np.sort(height_arr)

print('Height Matrix: ', height_arr)
print('np.sort() Matrix: ', sorted_height_arr)

Output:

Height Matrix:  [174 165 180 182 168]
np.sort() Matrix:  [165 168 174 180 182]

결과에서 보이다시피 sort()함수는 배열내의 값을 오름차순으로 정렬해준다.

내림차순으로 정렬을 하고 싶다면 다음과 같이 하면 된다.

1
2
desc_sorted_height_arr = np.sort(height_arr)[::-1]
print('np.sort()[::-1] : ', desc_sorted_height_arr)

Output:

np.sort()[::-1] :  [182 180 174 168 165]

위처럼 정렬을 할 때 sort()의 뒷부분에 [::-1]을 붙여주면 된다.

  • argsort()


1
2
3
4
5
6
fives = np.array([10, 5, 15, 20])
fives_order = fives.argsort()

print("The original data", fives)
print("The argsort(): ", fives_order)
print("The asending:", fives[fives_order])

Output:

The original data [10 5 15 20]
The argsort():  [1 0 2 3]
The asending: [ 5 10 15 20]

출력의 첫번째 줄은 가장 처음 입력했던 일반적인 배열이다.
두번째 줄은 오름차순으로 인덱스를 매긴 배열이며,
마지막은 두번째줄의 배열에 따라 첫번째줄의 결과인 배열을 정렬한 것이다.
결정 나무(Decision Tree) 간단 설명

결정 나무란?


결정 나무 Decision Tree 는 분류와 회귀 문제에 널리 사용하는 데이터마이닝 기법이다. 결정 나무는 결정을 하기위해 예/아니오 질문을 연속해가며 학습한다.

결정나무 간단설명영상
결정나무 사이킷런 튜토리얼

결정나무의 의사결정 과정


결정 나무가 행하는 이 과정은 ‘스무고개’를 할때의 그것과 비슷하다.
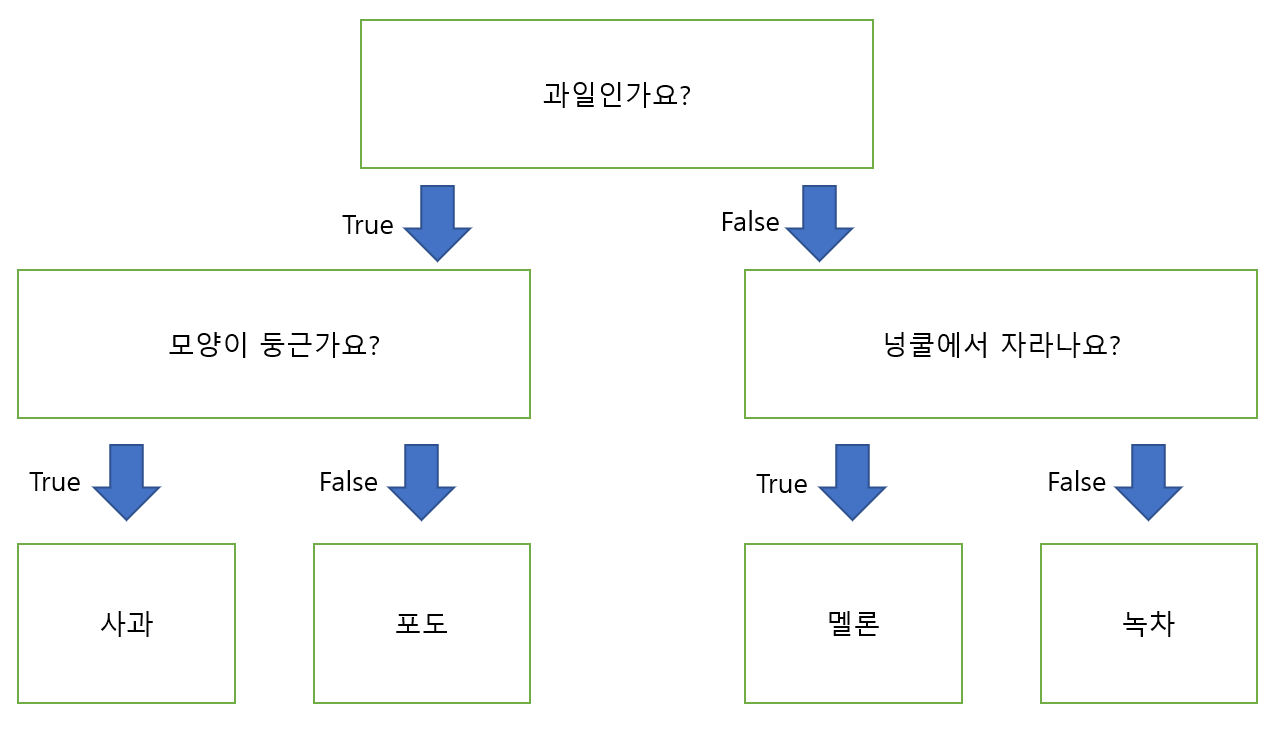
사과, 포도, 멜론, 녹차를 구분한다고 생각해보자. 사과와 포도는 과일이고 멜론과 녹차는 과일이 아니다.
‘과일인가요?’라는 질문을 통해 사과, 포도 / 멜론, 녹차를 나눌 수 있고, 사과와 포도는 ‘(과실 전체의)모양이 둥근가요?’, 멜론과 녹차는 ‘넝쿨에서 자라나요?’ 라는 질문을 통해 분류해 낼 수 있다.
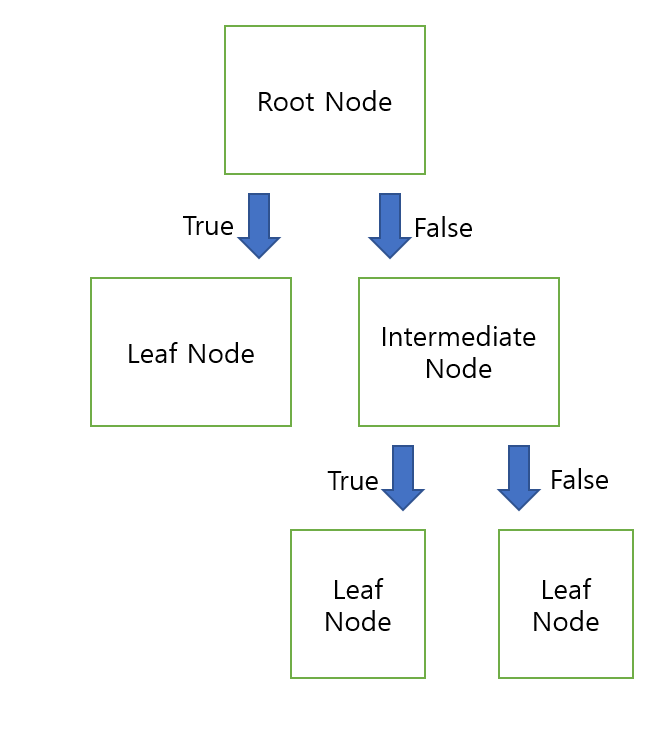
위의 결정나무를 도식화하면 아래와 같다.

도식화한 결정나무

이렇게 질문에 따라 데이터를 구분짓는 모델을 결정나무모델이라고 한다. 한번의 질문에 True 혹은 False를 통해 변수영역을 두 개로 분기한다.

모양이 나무를 뒤집어 놓은것 같아서 Decision Tree 이다.

위의 그림에서 각각의 네모상자를 노드Node라고 하며, 가장 처음의 분기점을 Root Node라고 하고, 가장 마지막 노드를 Leaf Node또는 Terminal Node라고 한다.

결정나무분류기 = DecisionTreeClassifier


DecisionTreeClassifier()는 결정나무의 기능을 바꿀수 있는 파라미터인데 파라미터 내부의 특성 하나하나를 하이퍼파라미터라고 한다.


DecisionTreeClassifier()파라미터의 괄호 안에 각각의 값을 입력할 수 있는데 다음과 같은 항목들이 있다.

하이퍼파라미터 기능
criterion 분할 품질을 측정하는 기능 (default : gini)
splitter 각 노드에서 분할을 선택하는 데 사용되는 전략 (default : best)
max_depth 트리의 최대 깊이 (값이 클수록 모델의 복잡도가 올라간다.)
min_samples_split 자식 노드를 분할하는데 필요한 최소 샘플 수 (default : 2)
min_samples_leaf 리프 노드에 있어야 할 최소 샘플 수 (default : 1)
min_weight_fraction_leaf min_sample_leaf와 같지만 가중치가 부여된 샘플 수에서의 비율
max_features 각 노드에서 분할에 사용할 특징의 최대 수
random_state 난수 seed 설정
max_leaf_nodes 리프 노드의 최대수
min_impurity_decrease 최소 불순도
min_impurity_split 나무 성장을 멈추기 위한 임계치
class_weight 클래스 가중치
presort 데이터 정렬 필요 여부

괄호 내부에 아무것도 입력하지않으면 기본값으로 결정나무가 출력된다.


References

파이썬 시각화 기본

파이썬 시각화의 기본 형태들


  • 선 그래프로 시각화하기
    1
    2
    3
    4
    5
    6
    7
    8
    9
    10
    11
    12
    13
    14
    import matplotlib.pyplot as plt

    dates = [
    '2021-01-01', '2021-01-02', '2021-01-03', '2021-01-04', '2021-01-05',
    '2021-01-06', '2021-01-07', '2021-01-08', '2021-01-09', '2021-01-10'
    ]
    min_temperature = [20.7, 17.9, 18.8, 14.6, 15.8, 15.8, 15.8, 17.4, 21.8, 20.0]
    max_temperature = [34.7, 28.9, 31.8, 25.6, 28.8, 21.8, 22.8, 28.4, 30.8, 32.0]

    fig, ax = plt.subplots()
    ax.plot(dates, min_temperature, label = "Min Temp")
    ax.plot(dates, max_temperature, label = "Max Temp")
    ax.legend()
    plt.show()
Output

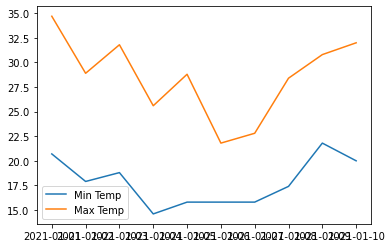
선 그래프로 시각화

  • 위의 그래프에서 크기의 변화를 준 그래프
    1
    2
    3
    4
    5
    6
    7
    8
    9
    10
    11
    12
    13
    14
    import matplotlib.pyplot as plt

    dates = [
    '2021-01-01', '2021-01-02', '2021-01-03', '2021-01-04', '2021-01-05',
    '2021-01-06', '2021-01-07', '2021-01-08', '2021-01-09', '2021-01-10'
    ]
    min_temperature = [20.7, 17.9, 18.8, 14.6, 15.8, 15.8, 15.8, 17.4, 21.8, 20.0]
    max_temperature = [34.7, 28.9, 31.8, 25.6, 28.8, 21.8, 22.8, 28.4, 30.8, 32.0]

    fig, axes = plt.subplots(nrows=1, ncols=1, figsize=(10,6))
    axes.plot(dates, min_temperature, label = 'Min Temperature')
    axes.plot(dates, max_temperature, label = 'Max Temperature')
    axes.legend()
    plt.show()
Output

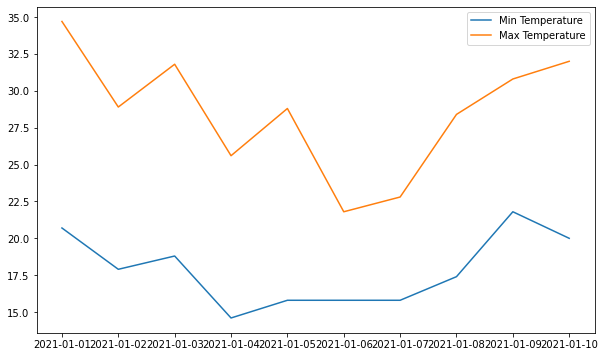
크기의 변화를 준 그래프

  • figaxes 출력
    1
    2
    print(fig)
    print(axes)
Output
Figure(720x432)
AxesSubplot(0.125,0.125;0.775x0.755)

Matplotlib


선 그래프

먼저 yfinance라이브러리를 사용하기 위해 설치를 한다.

1
!pip install yfinance --upgrade --no-cache-dir
실행시
Collecting yfinance
  Downloading yfinance-0.1.64.tar.gz (26 kB)
Requirement already satisfied: pandas>=0.24 in /usr/local/lib/python3.7/dist-packages (from yfinance) (1.1.5)
Requirement already satisfied: numpy>=1.15 in /usr/local/lib/python3.7/dist-packages (from yfinance) (1.19.5)
Requirement already satisfied: requests>=2.20 in /usr/local/lib/python3.7/dist-packages (from yfinance) (2.23.0)
Requirement already satisfied: multitasking>=0.0.7 in /usr/local/lib/python3.7/dist-packages (from yfinance) (0.0.9)
Collecting lxml>=4.5.1
  Downloading lxml-4.6.4-cp37-cp37m-manylinux_2_17_x86_64.manylinux2014_x86_64.manylinux_2_24_x86_64.whl (6.3 MB)
     |████████████████████████████████| 6.3 MB 5.3 MB/s 
[?25hRequirement already satisfied: python-dateutil>=2.7.3 in /usr/local/lib/python3.7/dist-packages (from pandas>=0.24->yfinance) (2.8.2)
Requirement already satisfied: pytz>=2017.2 in /usr/local/lib/python3.7/dist-packages (from pandas>=0.24->yfinance) (2018.9)
Requirement already satisfied: six>=1.5 in /usr/local/lib/python3.7/dist-packages (from python-dateutil>=2.7.3->pandas>=0.24->yfinance) (1.15.0)
Requirement already satisfied: urllib3!=1.25.0,!=1.25.1,<1.26,>=1.21.1 in /usr/local/lib/python3.7/dist-packages (from requests>=2.20->yfinance) (1.24.3)
Requirement already satisfied: certifi>=2017.4.17 in /usr/local/lib/python3.7/dist-packages (from requests>=2.20->yfinance) (2021.5.30)
Requirement already satisfied: idna<3,>=2.5 in /usr/local/lib/python3.7/dist-packages (from requests>=2.20->yfinance) (2.10)
Requirement already satisfied: chardet<4,>=3.0.2 in /usr/local/lib/python3.7/dist-packages (from requests>=2.20->yfinance) (3.0.4)
Building wheels for collected packages: yfinance
  Building wheel for yfinance (setup.py) ... [?25l[?25hdone
  Created wheel for yfinance: filename=yfinance-0.1.64-py2.py3-none-any.whl size=24109 sha256=da9039df457bcaed01c34fcce5bc8ee52dcf33151b9275684543166937fa1286
  Stored in directory: /tmp/pip-ephem-wheel-cache-qozcsm2m/wheels/86/fe/9b/a4d3d78796b699e37065e5b6c27b75cff448ddb8b24943c288
Successfully built yfinance
Installing collected packages: lxml, yfinance
  Attempting uninstall: lxml
    Found existing installation: lxml 4.2.6
    Uninstalling lxml-4.2.6:
      Successfully uninstalled lxml-4.2.6
Successfully installed lxml-4.6.4 yfinance-0.1.64

다음과 같이 출력되며 yfinace를 설치한다.

yfinance를 임포트해주고 그로부터 데이터를 받아와 출력을 할수 있다.

1
2
3
import yfinance as yf
data = yf.download('AAPL', '2019-08-01', '2020-08-01')
data.info()
Output
[*********************100%***********************]  1 of 1 completed
<class 'pandas.core.frame.DataFrame'>
DatetimeIndex: 253 entries, 2019-08-01 to 2020-07-31
Data columns (total 6 columns):
 #   Column     Non-Null Count  Dtype  
---  ------     --------------  -----  
 0   Open       253 non-null    float64
 1   High       253 non-null    float64
 2   Low        253 non-null    float64
 3   Close      253 non-null    float64
 4   Adj Close  253 non-null    float64
 5   Volume     253 non-null    int64  
dtypes: float64(5), int64(1)
memory usage: 13.8 KB

다음과 같이 애플의 1년동안의 주가를 볼 수 있다.

데이터의 컬럼을 지목해서 열람하는것 역시 가능하다.

1
2
ts = data['Open']
print(ts.head())
Output
Date
2019-08-01    53.474998
2019-08-02    51.382500
2019-08-05    49.497501
2019-08-06    49.077499
2019-08-07    48.852501
Name: Open, dtype: float64

data에 담겨있는 애플의 주가정보 중 ‘Open’에 해당하는 전일 종가를 가장 앞쪽(.head())부터 출력한 것이다.
애플주식이 이렇게 쌌었나 검색해보니 이게 맞다….


방법 1. Pyplot API


1
2
3
4
5
6
7
8
9
10
11
12
13
# import fix_yahoo_finance as yf
import yfinance as yf
import matplotlib.pyplot as plt

data = yf.download('AAPL', '2019-11-01', '2021-11-01')
ts = data['Open']
plt.figure(figsize=(10,6))
plt.plot(ts)
plt.legend(labels=['Price'], loc='best')
plt.title('Stock Market fluctuation of AAPL')
plt.xlabel('Date')
plt.ylabel('Stock Market Open Price')
plt.show()
Output
[*********************100%***********************]  1 of 1 completed

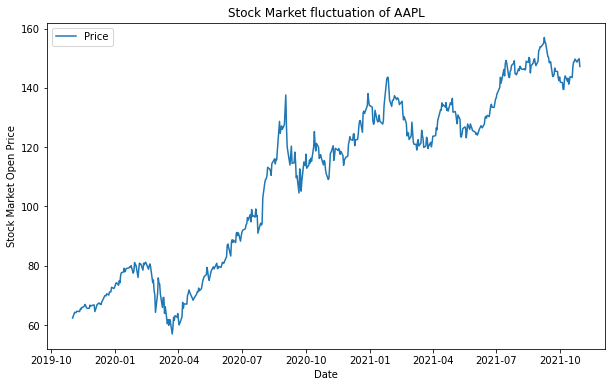
애플의 최근 2년간 전일종가 그래프
이처럼 결과가 출력되지만 이 문법은 시각화를 처음배우는 초심자에게는 적합하지 않다고 한다.
후술할 문법과 위 문법 모두 출력은 되나 이 문법은 객체지향이 아니기도 하고 상대적으로 복잡하기때문에 초심자의 경우에 헷갈릴수 있어 사용하지 않는다.
구글링 했을때 객체.이 아닌 plt.으로 시작하는 애들이 있다면 그 코드는 스킵하는게 좋다.


방법 2. 객체지향 API


1
2
3
4
5
6
7
8
9
10
11
12
13
14
15
from matplotlib.backends.backend_agg import FigureCanvasAgg as FigureCanvas
from matplotlib.figure import Figure
import matplotlib.pyplot as plt

fig = Figure()

import numpy as np
np.random.seed(6)
x = np.random.randn(20000)

ax = fig.add_subplot(111)
ax.hist(x, 100)
ax.set_title('Artist Layer Histogram')
# fig.savefig('Matplotlib_histogram.png')
plt.show()

이 방법에 대해서는 따로 언급이 없었기 때문에 바로 방법 3으로 넘어간다.


방법 3. Pyplot API + 객체지향 API


1
2
3
4
5
6
7
8
9
10
11
12
13
import yfinance as yf
import matplotlib.pyplot as plt

data = yf.download('AAPL', '2019-08-01', '2020-08-01')
ts = data['Open']

fig, ax = plt.subplots(figsize=(10, 6))
ax.plot(ts)
ax.set_title('Stock Market fluctuation of AAPL')
ax.legend(labels=['Price'], loc='best')
ax.set_xlabel('Date')
ax.set_ylabel('Stock Market Open Price')
plt.show()
Output
[*********************100%***********************]  1 of 1 completed


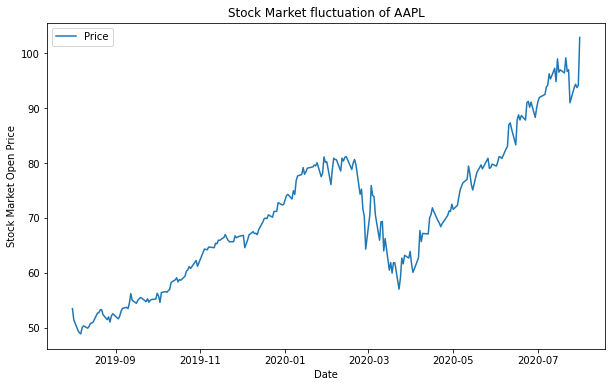
드디어 꼭 외우라고 하셨던 pyplot + 객체지향 API 방법이다.
특히 7번째 행 부터 마지막까지가 중요한데 그에대한 설명은 아래에 표로 적겠다.
중요하다 몇번을 강조하셨으니 위 코드는 변형을 해가며 여러번 작성해보자.

설명 표
코드 설명
fig, ax = plt.subplots() 데이터 전체적 외형을 설정하는 부분
ax.plot(ts) 데이터를 표현해주는 행
ax.set_title() 데이터 시각화의 제목
ax.legend() 범례
ax.set_xlabel() x축 데이터의 제목
ax.set_ylabel() y축 데이터의 제목
plt.show() 안해도 상관없으나 ‘완료후 게시’ 라는 뜻으로 작성
앞으로 나올 표의 내용도 표의 위에 있는 코드들과 적절히 섞어서 이해하길 바란다.

막대 그래프


1
2
3
4
5
6
7
8
9
10
11
12
13
14
15
16
17
import matplotlib.pyplot as plt
import numpy as np
import calendar

month_list = [1, 2, 3, 4, 5, 6, 7, 8, 9, 10, 11, 12]
sold_list = [300, 400, 550, 900, 600, 960, 900, 910, 800, 700, 550, 450]

fig, ax = plt.subplots(figsize=(10,6))
plt.xticks(month_list, calendar.month_name[1:13], rotation=90)
plot = ax.bar(month_list, sold_list)
for rect in plot:
print("graph:", rect)
height = rect.get_height()
ax.text(rect.get_x() + rect.get_width()/2., 1.002*height,'%d' %
int(height), ha='center', va='bottom')

plt.show()
Output
graph: Rectangle(xy=(0.6, 0), width=0.8, height=300, angle=0)
graph: Rectangle(xy=(1.6, 0), width=0.8, height=400, angle=0)
graph: Rectangle(xy=(2.6, 0), width=0.8, height=550, angle=0)
graph: Rectangle(xy=(3.6, 0), width=0.8, height=900, angle=0)
graph: Rectangle(xy=(4.6, 0), width=0.8, height=600, angle=0)
graph: Rectangle(xy=(5.6, 0), width=0.8, height=960, angle=0)
graph: Rectangle(xy=(6.6, 0), width=0.8, height=900, angle=0)
graph: Rectangle(xy=(7.6, 0), width=0.8, height=910, angle=0)
graph: Rectangle(xy=(8.6, 0), width=0.8, height=800, angle=0)
graph: Rectangle(xy=(9.6, 0), width=0.8, height=700, angle=0)
graph: Rectangle(xy=(10.6, 0), width=0.8, height=550, angle=0)
graph: Rectangle(xy=(11.6, 0), width=0.8, height=450, angle=0)

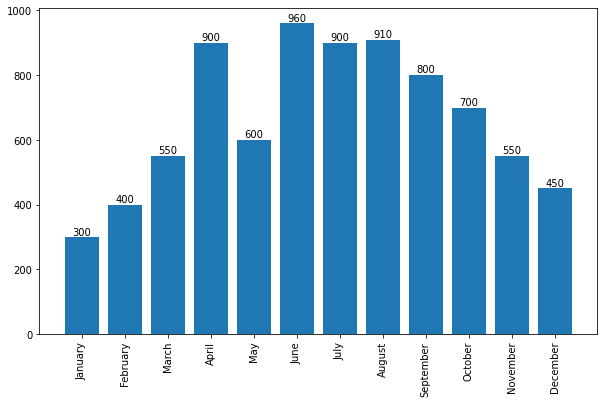
막대 그래프로 시각화

메소드 설명

.xticks()는 x축의 눈금을 나타내는 메소드인데 기본적으로는 list자료형 한개을 사용한다.
하지만 메소드에 인자가 ‘list’ 두 개로 받아졌을 경우,
첫번째 list는 x축 눈금의 갯수가 된다.
두번째 list는 x축 눈금의 이름이 된다.
이 코드에서는 rotation 옵션도 들어가 있는데 이것은 그냥 이름을 몇도정도 기울일지 나타낸다.


plot = ax.bar()는 그래프를 막대로 만든다.
첫번째 리스트 인자의 수 만큼 막대가 생성되고,
두번째 리스트 인자의 값 만큼 막대가 길어진다.
이렇다보니 첫번째 리스트와 두번째 리스트의 인자의 수가 일치해야 에러가 나지 않는다.


for문 내부의 ax.text()Seaborn-막대그래프-표현할 값이 한 개인 막대 그래프 챕터에 서술했으니 참고하길 바란다.

산점도 그래프


  • 두개의 연속형 변수 (키, 몸무게 등)
  • 상관관계 != 인과관계


  • 나타내는 값이 한가지인 산점도 그래프
1
2
3
4
5
6
7
8
9
10
11
12
13
14
15
import matplotlib.pyplot as plt
import seaborn as sns

# 내장 데이터
tips = sns.load_dataset("tips")
x = tips['total_bill']
y = tips['tip']

fig, ax = plt.subplots(figsize=(10, 6))
ax.scatter(x, y) # 각각의 값을 선으로 표현해주는 scatter()
ax.set_xlabel('Total Bill')
ax.set_ylabel('Tip')
ax.set_title('Tip ~ Total Bill')

fig.show()
Output

전체 값 대비 팁


  • 나타내는 값이 두 가지인 산점도 그래프
1
2
3
4
5
6
7
8
9
10
11
12
13
label, data = tips.groupby('sex')
tips['sex_color'] = tips['sex'].map({"Female" : "#0000FF", "Male" : "#00FF00"})

fig, ax = plt.subplots(figsize=(10, 6))
for label, data in tips.groupby('sex'):
ax.scatter(data['total_bill'], data['tip'], label=label,
color=data['sex_color'], alpha=0.5)
ax.set_xlabel('Total Bill')
ax.set_ylabel('Tip')
ax.set_title('Tip ~ Total Bill by Gender')

ax.legend()
fig.show()
Output

전체 값 대비 팁의 성별분포

히스토그램


  • 수치형 변수 1개
1
2
3
4
5
6
7
8
9
10
11
12
13
14
15
16
import matplotlib.pyplot as plt
import numpy as np
import seaborn as sns

# 내장 데이터
titanic = sns.load_dataset('titanic')
age = titanic['age']

nbins = 21
fig, ax = plt.subplots(figsize=(10, 6))
ax.hist(age, bins = nbins) # 여기서 bins = nbins는 히스토그램을 더 세밀하게 나누어 준다.
ax.set_xlabel("Age")
ax.set_ylabel("Frequency")
ax.set_title("Distribution of Aae in Titanic")
ax.axvline(x = age.mean(), linewidth = 2, color = 'r')
fig.show()
Output

타이타닉호 탑승객의 나이 분포

코드 설명
.hist() 데이터를 히스토그램으로 표현해주는 메소드
.axvline() 데이터의 평균을 선으로 나타내주는 메소드

박스플롯


  • x축 변수: 범주형 변수, 그룹과 관련있는 변수, 문자열
  • y축 변수: 수치형 변수
1
2
3
4
5
6
7
8
9
10
11
12
13
import matplotlib.pyplot as plt
import seaborn as sns

iris = sns.load_dataset('iris')

data = [iris[iris['species']=="setosa"]['petal_width'],
iris[iris['species']=="versicolor"]['petal_width'],
iris[iris['species']=="virginica"]['petal_width']]

fig, ax = plt.subplots(figsize=(10, 6))
ax.boxplot(data, labels=['setosa', 'versicolor', 'virginica'])

fig.show()
Output

png
수정바람) 정확히 어떻게 이 그래프가 출력되는지 모르기에 좀 더 공부후 수정할 것

히트맵


1
2
3
4
5
6
7
8
9
10
11
12
13
14
15
import matplotlib.pyplot as plt
import numpy as np
import seaborn as sns

# 내장 데이터
flights = sns.load_dataset("flights")
flights = flights.pivot("month", "year", "passengers")

fig, ax = plt.subplots(figsize=(12, 6))
im = ax.imshow(flights, cmap = 'YlGnBu')
ax.set_xticklabels(flights.columns, rotation = 20)
ax.set_yticklabels(flights.index, rotation = 10)
fig.colorbar(im)

fig.show()
Output
     year month  passengers
0    1949   Jan         112
1    1949   Feb         118
2    1949   Mar         132
3    1949   Apr         129
4    1949   May         121
..    ...   ...         ...
139  1960   Aug         606
140  1960   Sep         508
141  1960   Oct         461
142  1960   Nov         390
143  1960   Dec         432

[144 rows x 3 columns]

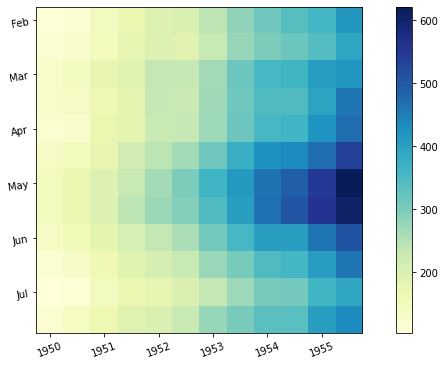
연,월별 승객의 수

제목 제목
fig.colorbar() 값의 빈도 수에 대한 컬러바생성

Seaborn


산점도와 회귀선이 있는 산점도


  • 산점도
1
2
3
4
5
6
7
8
%matplotlib inline 

import matplotlib.pyplot as plt
import seaborn as sns

tips = sns.load_dataset("tips")
sns.scatterplot(x = "total_bill", y = "tip", data = tips)
plt.show()
Output

산점도


  • 회귀선이 있는 산점도
1
2
3
4
5
6
7
8
9
10
11
12
13
14
fig, ax = plt.subplots(nrows = 1, ncols = 2, figsize=(15, 5))
sns.regplot(x = "total_bill",
y = "tip",
data = tips,
ax = ax[0],
fit_reg = True)

sns.regplot(x = "total_bill",
y = "tip",
data = tips,
ax = ax[1],
fit_reg = False)

plt.show()
Output

회귀선이 있는 산점도
위의 코드처럼 fit_reg = True로 해줄 경우 회귀선이 나타나는것을 알 수 있다.
그리고 ax = ax[num]의 경우에는 그래프의 인덱스로 보인다.

히스토그램/커널 밀도 그래프


1
2
3
4
5
6
7
8
9
10
import matplotlib.pyplot as plt
import seaborn as sns

tips = sns.load_dataset("tips")

plt.figure(figsize=(10, 6))
sns.displot(x = "tip", data = tips)
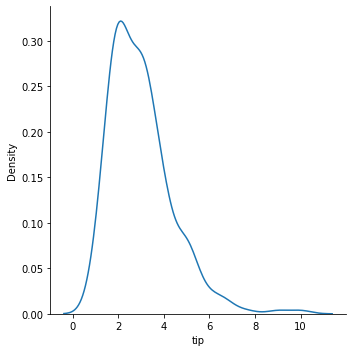
sns.displot(x="tip", kind="kde", data=tips) # 종류 = 커널밀도 그래프(kde)
sns.displot(x="tip", kde=True, data=tips) # 히스토그램에 kde를 넣을건가 = True
plt.show()
Output
<Figure size 720x432 with 0 Axes>

히스토그램
커널 밀도 그래프
커널 밀드 그래프가 그려진 히스토그램

박스플롯

1
2
3
4
5
6
7
8
#import matplotlib.pyplot as plt  # 주석처리된 부분은 원래 실행 해줘야 하는 내용이지만 위 히스토그램 챕터에서 미리 입력했기 때문에 생략한다. 
#import seaborn as sns

#tips = sns.load_dataset("tips")

sns.boxplot(x = "day", y = "total_bill", data = tips)
sns.swarmplot(x = "day", y = "total_bill", data = tips, alpha = .25)
plt.show()
Output

박스플롯

막대 그래프

1
2
3
4
5
6
7
#import matplotlib.pyplot as plt  # 이 주석 역시 원래 실행 해줘야 하는 내용이지만 위 히스토그램 챕터에서 미리 입력했기 때문에 생략한다. 이하 기본주석이라 하고 생략한다.
#import seaborn as sns

#tips = sns.load_dataset("tips")

sns.countplot(x = "day", data = tips)
plt.show()
Output

png


'tips'Data의 'day'값, 인덱스별 정렬, 'tips'의 내림차순 재배치
1
2
3
print(tips['day'].value_counts())
print("index: ", tips['day'].value_counts().index)
print("values: ", tips['day'].value_counts().values)
Sat     87
Sun     76
Thur    62
Fri     19
Name: day, dtype: int64
index:  CategoricalIndex(['Sat', 'Sun', 'Thur', 'Fri'], categories=['Thur', 'Fri', 'Sat', 'Sun'], ordered=False, dtype='category')
values:  [87 76 62 19]

'tips'Data의 'day'값에 대한 오름차순(ascending) 정렬
1
print(tips['day'].value_counts(ascending=True))
Fri     19
Thur    62
Sun     76
Sat     87
Name: day, dtype: int64

  • 표현할 값이 한 개인 막대 그래프
1
2
3
4
5
6
7
# 기본주석 생략
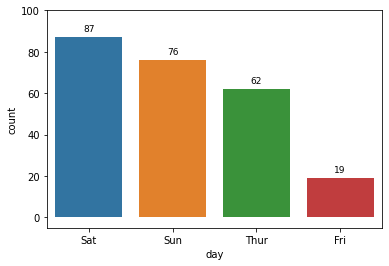
ax = sns.countplot(x = "day", data = tips, order = tips['day'].value_counts().index) # x축을 'day'로 지정, data는 'tips'로 채워넣음, 'day'의 값이 높은 순서대로 막대그래프 정렬
for p in ax.patches: # ax.patches = p
height = p.get_height() # 아래행을 실행하기위해 막대그래프의 높이 가져옴
ax.text(p.get_x() + p.get_width()/2., height+3, height, ha = 'center', size=9) # 막대그래프 위 수치 작성
ax.set_ylim(-5, 100) # y축 최소, 최대범위
plt.show()
Output

나타낼 값이 한 개인 막대그래프
나중에 다시 본다면 조금 설명이 필요할 것 같다.
특히 ax.text행의 인자가 조금 많은데 설명이 필요한 듯하다.
직접 colab에서 이것저것 만져본 결과 추측하기로는 다음 표과 같은듯 하다.

코드 설명
p.get_x() + p.get_width()/2. 수치가 들어갈 x축 위지
height+3 y축 위치(현재 +3)
height 수치의 값을 조절할 것인지(현재 +0)
ha = ‘center’ 수치를 (x,y)축의 가운데로 정렬
size=9 폰트의 크기이다

여기서 혹시나 ha = 'center'부분이 잘 이해가 안될수 있다.내가그랬다
ha =는 (x,y)축의 기준이 될 곳을 정하는 인자인듯 하다.
center말고도 left,right등을 사용할수 있는데 막대의 기준에서 왼쪽,오른쪽이 아닌 텍스트의 기준에서 왼쪽,오른쪽이라 방향을 선택하면 오히려 반대로 배치되는것을 알 수 있다.

  • 표현할 값이 두 개인 막대 그래프
1
2
3
4
5
6
7
8
9
# 기본주석 생략
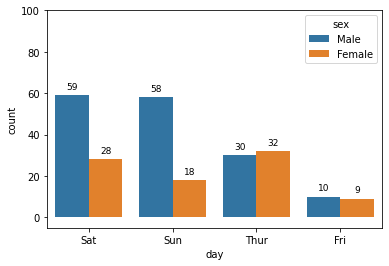
ax = sns.countplot(x = "day", data = tips, hue = "sex", dodge = True,
order = tips['day'].value_counts().index)
for p in ax.patches:
height = p.get_height()
ax.text(p.get_x() + p.get_width()/2., height+3, height, ha = 'center', size=9)
ax.set_ylim(-5, 100)

plt.show()
Output

나타낼 값이 두 개인 막대그래프

이 코드에서 첫째줄의 인자를 표로 나타내면

코드 설명
x = “day” x축이 나타낼 자료
data = tips 표현할 데이터셋
hue = “sex” 그래프로 표현할 항목
dodge = True 항목끼리 나눠서 표현할 것인지
order = tips[‘day’].value_counts().index ‘day’의 값이 높은 순서대로 그래프 정렬

sns.countplot() x축이 나타낼 자료, 나타낼 데이터셋, 그래프로 나타낼 항목, 항목끼리 나눠서 표현할것인지, ‘day’의 값이 높은 순서대로 막대그래프 정렬

상관관계 그래프


데이터 불러오기 및 행, 열 갯수 표시하기
1
2
3
4
5
6
7
8
9
10
import pandas as pd 
import numpy as np
import seaborn as sns
import matplotlib.pyplot as plt

mpg = sns.load_dataset("mpg")
print(mpg.shape) # 398 행, 9개 열

num_mpg = mpg.select_dtypes(include = np.number) # num_mpg에 'mpg' 데이터셋의 데이터타입 총갯수를 입력한다(숫자형 데이터타입만 포함)
print(num_mpg.shape) # 398 행, 7개 열 (두개가 사라진 이유는 number타입이 아닌 Object타입이기 때문)
(398, 9)
(398, 7)

데이터셋의 컬럼 표시
1
num_mpg.info()
<class 'pandas.core.frame.DataFrame'>
RangeIndex: 398 entries, 0 to 397
Data columns (total 7 columns):
 #   Column        Non-Null Count  Dtype  
---  ------        --------------  -----  
 0   mpg           398 non-null    float64
 1   cylinders     398 non-null    int64  
 2   displacement  398 non-null    float64
 3   horsepower    392 non-null    float64
 4   weight        398 non-null    int64  
 5   acceleration  398 non-null    float64
 6   model_year    398 non-null    int64  
dtypes: float64(4), int64(3)
memory usage: 21.9 KB

데이터셋 컬럼간의 상관관계 표시
1
num_mpg.corr()

mpg cylinders displacement horsepower weight acceleration model_year
mpg 1.000000 -0.775396 -0.804203 -0.778427 -0.831741 0.420289 0.579267
cylinders -0.775396 1.000000 0.950721 0.842983 0.896017 -0.505419 -0.348746
displacement -0.804203 0.950721 1.000000 0.897257 0.932824 -0.543684 -0.370164
horsepower -0.778427 0.842983 0.897257 1.000000 0.864538 -0.689196 -0.416361
weight -0.831741 0.896017 0.932824 0.864538 1.000000 -0.417457 -0.306564
acceleration 0.420289 -0.505419 -0.543684 -0.689196 -0.417457 1.000000 0.288137
model_year 0.579267 -0.348746 -0.370164 -0.416361 -0.306564 0.288137 1.000000

  • 상관관계 히트맵
1
2
3
4
5
6
7
8
9
10
11
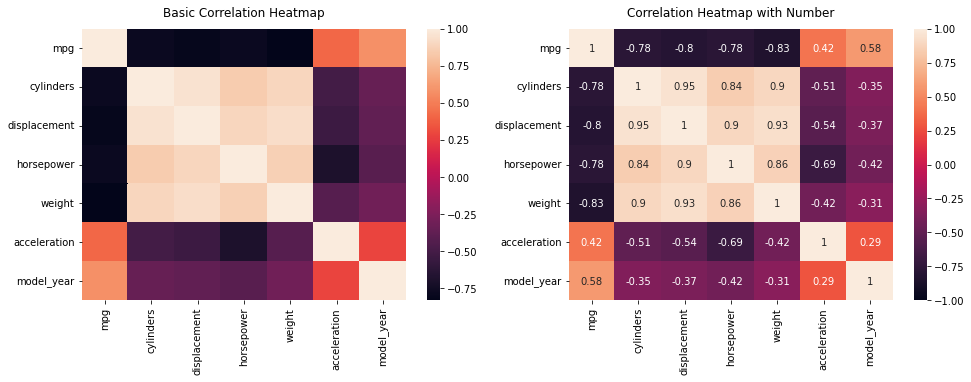
fig, ax = plt.subplots(nrows = 1, ncols = 2, figsize=(16, 5))

# 기본 그래프 [Basic Correlation Heatmap]
sns.heatmap(num_mpg.corr(), ax=ax[0])
ax[0].set_title('Basic Correlation Heatmap', pad = 12)

# 상관관계 수치 그래프 [Correlation Heatmap with Number]
sns.heatmap(num_mpg.corr(), vmin=-1, vmax=1, annot=True, ax=ax[1])
ax[1].set_title('Correlation Heatmap with Number', pad = 12)

plt.show()
Output

png

위의 코드에서 pad는 히트맵과 타이틀의 간격설정이며,
set_title의 인자를 설명하면 (히트맵을 만들 ‘데이터셋.corr()’, 히트맵의 최소값, 최대값, 수치표현(bool값), 마지막인자는 확실하지는 않지만 앞의 히트맵 설정을 어떤 히트맵에 적용시킬지 묻는것 같다.)


상관관계 배열 만들기
1
2
3
4
# import numpy as np
# 윗단 코드에서 만들어진 num_mpg 사용
print(int(True))
np.triu(np.ones_like(num_mpg.corr()))
1
array([[1., 1., 1., 1., 1., 1., 1.],
       [0., 1., 1., 1., 1., 1., 1.],
       [0., 0., 1., 1., 1., 1., 1.],
       [0., 0., 0., 1., 1., 1., 1.],
       [0., 0., 0., 0., 1., 1., 1.],
       [0., 0., 0., 0., 0., 1., 1.],
       [0., 0., 0., 0., 0., 0., 1.]])

np.triu(배열, k=0)는 위 결과처럼 우하향 대각선이 있고 위 아래로 삼각형이 있다 생각했을때 아래쪽의 삼각형이 모두 0이 되는 함수이다.
k의 숫자가 낮아질수록 삼각형은 한칸씩 작아진다.
위 결과에서 행과 열이 7칸이 된 이유는 np.ones_like(num_mpg.corr())의 행이 7개 이기때문인듯 하다.
확실히 모르겠음 질문 필수


1
2
mask = np.triu(np.ones_like(num_mpg.corr(), dtype=np.bool))
print(mask)
[[ True  True  True  True  True  True  True]
 [False  True  True  True  True  True  True]
 [False False  True  True  True  True  True]
 [False False False  True  True  True  True]
 [False False False False  True  True  True]
 [False False False False False  True  True]
 [False False False False False False  True]]

k 값을 바꿔 True와 False로 값을 준 경우.

1
2
3
4
5
6
7
8
9
10
# 기본주석 생략
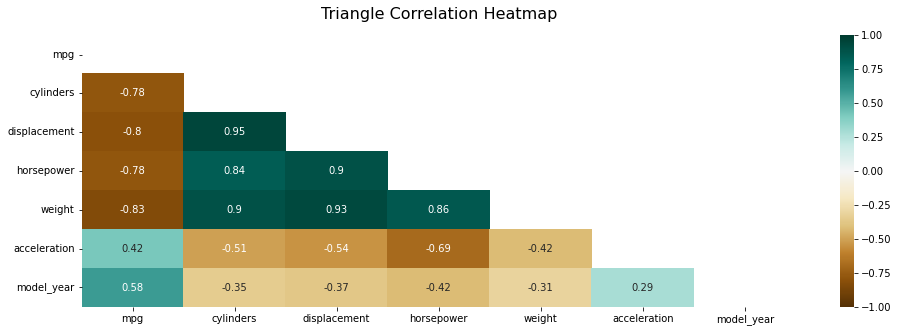
fig, ax = plt.subplots(figsize=(16, 5))

# 기본 그래프 [Basic Correlation Heatmap]
ax = sns.heatmap(num_mpg.corr(), mask=mask,
vmin=-1, vmax = 1,
annot=True,
cmap="BrBG", cbar = True)
ax.set_title('Triangle Correlation Heatmap', pad = 16, size = 16)
fig.show()
Output

png

위의 글들을 모두 읽었음에도 단 하나 모르는 요소가 있다면 바로 cmap일 것이다.
cmap은 colormap을 줄인것으로 cmap의 종류는 상당히 많다.
이곳에 가면 상당히 잘 정리되어 있으니 cmap옵션을 사용할 때마다 요긴하게 쓸 수 있을것이다.

Intermediate

페가블로그 코드


  • 이 챕터의 내용은 코드가 너무 긺으로 시각화 결과물을 접지않고 코드를 접는형식으로 서술하겠음.

  • 필수 코드이므로 생략을 생략

    1
    2
    3
    4
    import matplotlib.pyplot as plt
    from matplotlib.ticker import (MultipleLocator, AutoMinorLocator, FuncFormatter)
    import seaborn as sns
    import numpy as np
Code
1
2
3
4
5
6
7
8
9
10
11
12
13
14
15
16
17
18
19
20
21
22
23
24
25
26
27
28
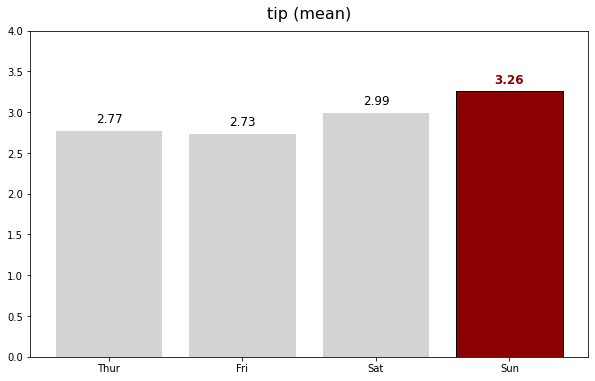
def plot_example(ax, zorder=0):
ax.bar(tips_day["day"], tips_day["tip"], color="lightgray", zorder=zorder)
ax.set_title("tip (mean)", fontsize=16, pad=12)

# Values
h_pad = 0.1
for i in range(4):
fontweight = "normal"
color = "k"
if i == 3:
fontweight = "bold"
color = "darkred"

ax.text(i, tips_day["tip"].loc[i] + h_pad, f"{tips_day['tip'].loc[i]:0.2f}",
horizontalalignment='center', fontsize=12, fontweight=fontweight, color=color)

# Sunday
ax.patches[3].set_facecolor("darkred")
ax.patches[3].set_edgecolor("black")

# set_range
ax.set_ylim(0, 4)
return ax

def major_formatter(x, pos):
return "{%.2f}" % x
formatter = FuncFormatter(major_formatter)

1
2
3
tips = sns.load_dataset("tips")
tips_day = tips.groupby("day").mean().reset_index()
print(tips_day)
    day  total_bill       tip      size
0  Thur   17.682742  2.771452  2.451613
1   Fri   17.151579  2.734737  2.105263
2   Sat   20.441379  2.993103  2.517241
3   Sun   21.410000  3.255132  2.842105

Code
1
2
fig, ax = plt.subplots(figsize=(10, 6))
ax = plot_example(ax, zorder=2)

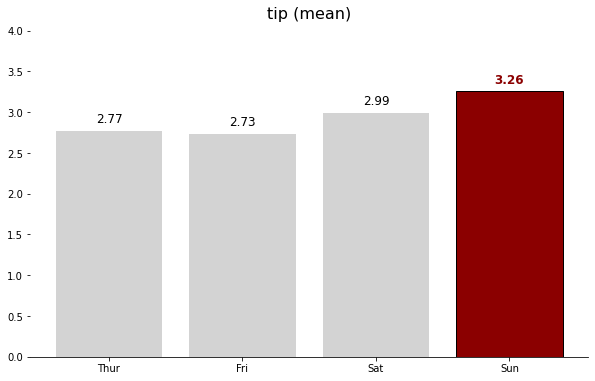
png

Code
1
2
3
4
5
6
fig, ax = plt.subplots(figsize=(10, 6))
ax = plot_example(ax, zorder=2)

ax.spines["top"].set_visible(False)
ax.spines["right"].set_visible(False)
ax.spines["left"].set_visible(False)

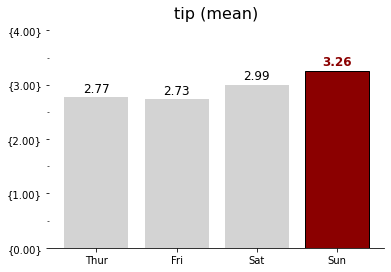
png

Code
1
2
3
4
5
6
7
8
9
10
fig, ax = plt.subplots()
ax = plot_example(ax, zorder=2)

ax.spines["top"].set_visible(False)
ax.spines["right"].set_visible(False)
ax.spines["left"].set_visible(False)

ax.yaxis.set_major_locator(MultipleLocator(1))
ax.yaxis.set_major_formatter(formatter)
ax.yaxis.set_minor_locator(MultipleLocator(0.5))

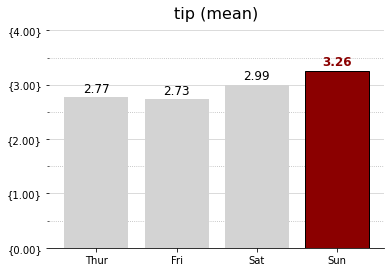
png

Code
1
2
3
4
5
6
7
8
9
10
11
12
13
fig, ax = plt.subplots()
ax = plot_example(ax, zorder=2)

ax.spines["top"].set_visible(False)
ax.spines["right"].set_visible(False)
ax.spines["left"].set_visible(False)

ax.yaxis.set_major_locator(MultipleLocator(1))
ax.yaxis.set_major_formatter(formatter)
ax.yaxis.set_minor_locator(MultipleLocator(0.5))

ax.grid(axis="y", which="major", color="lightgray")
ax.grid(axis="y", which="minor", ls=":")

png

책 코드


Code
1
2
3
4
5
6
7
8
9
10
11
12
13
14
15
16
import matplotlib.pyplot as plt
from matplotlib.ticker import (MultipleLocator, AutoMinorLocator, FuncFormatter)
import seaborn as sns
import numpy as np

tips = sns.load_dataset("tips")
fig, ax = plt.subplots(nrows = 1, ncols = 2, figsize=(16, 5))

def major_formatter(x, pos):
return "%.2f$" % x
formatter = FuncFormatter(major_formatter)

# Ideal Bar Graph
ax0 = sns.barplot(x = "day", y = 'total_bill', data = tips,
ci=None, color='lightgray', alpha=0.85, zorder=2,
ax=ax[0])

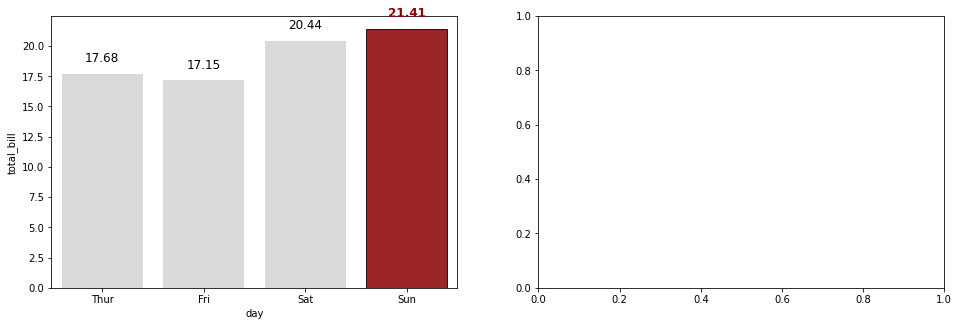
png

Code
1
2
3
4
5
group_mean = tips.groupby(['day'])['total_bill'].agg('mean')
h_day = group_mean.sort_values(ascending=False).index[0]
h_mean = np.round(group_mean.sort_values(ascending=False)[0], 2)
print("The Best Day:", h_day)
print("The Highest Avg. Total Biil:", h_mean)
The Best Day: Sun
The Highest Avg. Total Biil: 21.41
Code
1
2
3
4
5
6
7
8
9
10
11
12
13
14
15
16
17
18
19
20
21
22
23
tips = sns.load_dataset("tips")
fig, ax = plt.subplots(nrows = 1, ncols = 2, figsize=(16, 5))

# Ideal Bar Graph
ax0 = sns.barplot(x = "day", y = 'total_bill', data = tips,
ci=None, color='lightgray', alpha=0.85, zorder=2,
ax=ax[0])

group_mean = tips.groupby(['day'])['total_bill'].agg('mean')
h_day = group_mean.sort_values(ascending=False).index[0]
h_mean = np.round(group_mean.sort_values(ascending=False)[0], 2)
for p in ax0.patches:
fontweight = "normal"
color = "k"
height = np.round(p.get_height(), 2)
if h_mean == height:
fontweight="bold"
color="darkred"
p.set_facecolor(color)
p.set_edgecolor("black")
ax0.text(p.get_x() + p.get_width()/2., height+1, height, ha = 'center', size=12, fontweight=fontweight, color=color)

fig.show()

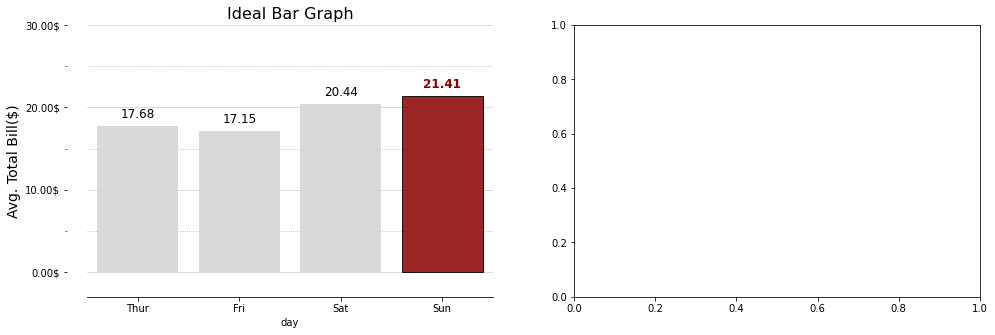
png

Code
1
2
3
4
5
6
7
8
9
10
11
12
13
14
15
16
17
18
19
20
21
22
23
24
25
26
27
28
29
30
31
32
33
34
35
36
37
38
39
40
41
42
43
44
45
46
47
48
49
import matplotlib.pyplot as plt
from matplotlib.ticker import (MultipleLocator, AutoMinorLocator, FuncFormatter)
import seaborn as sns
import numpy as np

tips = sns.load_dataset("tips")
fig, ax = plt.subplots(nrows = 1, ncols = 2, figsize=(16, 5))

def major_formatter(x, pos):
return "%.2f$" % x
formatter = FuncFormatter(major_formatter)

# Ideal Bar Graph
ax0 = sns.barplot(x = "day", y = 'total_bill', data = tips,
ci=None, color='lightgray', alpha=0.85, zorder=2,
ax=ax[0])

group_mean = tips.groupby(['day'])['total_bill'].agg('mean')
h_day = group_mean.sort_values(ascending=False).index[0]
h_mean = np.round(group_mean.sort_values(ascending=False)[0], 2)
for p in ax0.patches:
fontweight = "normal"
color = "k"
height = np.round(p.get_height(), 2)
if h_mean == height:
fontweight="bold"
color="darkred"
p.set_facecolor(color)
p.set_edgecolor("black")
ax0.text(p.get_x() + p.get_width()/2., height+1, height, ha = 'center', size=12, fontweight=fontweight, color=color)

ax0.set_ylim(-3, 30)
ax0.set_title("Ideal Bar Graph", size = 16)

ax0.spines['top'].set_visible(False)
ax0.spines['left'].set_position(("outward", 20))
ax0.spines['left'].set_visible(False)
ax0.spines['right'].set_visible(False)

ax0.yaxis.set_major_locator(MultipleLocator(10))
ax0.yaxis.set_major_formatter(formatter)
ax0.yaxis.set_minor_locator(MultipleLocator(5))

ax0.set_ylabel("Avg. Total Bill($)", fontsize=14)

ax0.grid(axis="y", which="major", color="lightgray")
ax0.grid(axis="y", which="minor", ls=":")

fig.show()

png

Code
1
2
3
4
5
6
7
8
9
10
11
12
13
14
15
16
17
18
19
20
21
22
23
24
25
26
27
28
29
30
31
32
33
34
35
36
37
38
39
40
41
42
43
44
45
46
47
48
49
50
51
52
53
54
55
56
57
58
59
60
61
62
63
64
65
66
import matplotlib.pyplot as plt
from matplotlib.ticker import (MultipleLocator, AutoMinorLocator, FuncFormatter)
import seaborn as sns
import numpy as np

tips = sns.load_dataset("tips")
fig, ax = plt.subplots(nrows = 1, ncols = 2, figsize=(16, 5))

def major_formatter(x, pos):
return "%.2f$" % x
formatter = FuncFormatter(major_formatter)

# Ideal Bar Graph
ax0 = sns.barplot(x = "day", y = 'total_bill', data = tips,
ci=None, color='lightgray', alpha=0.85, zorder=2,
ax=ax[0])

group_mean = tips.groupby(['day'])['total_bill'].agg('mean')
h_day = group_mean.sort_values(ascending=False).index[0]
h_mean = np.round(group_mean.sort_values(ascending=False)[0], 2)
for p in ax0.patches:
fontweight = "normal"
color = "k"
height = np.round(p.get_height(), 2)
if h_mean == height:
fontweight="bold"
color="darkred"
p.set_facecolor(color)
p.set_edgecolor("black")
ax0.text(p.get_x() + p.get_width()/2., height+1, height, ha = 'center', size=12, fontweight=fontweight, color=color)

ax0.set_ylim(-3, 30)
ax0.set_title("Ideal Bar Graph", size = 16)

ax0.spines['top'].set_visible(False)
ax0.spines['left'].set_position(("outward", 20))
ax0.spines['left'].set_visible(False)
ax0.spines['right'].set_visible(False)

ax0.yaxis.set_major_locator(MultipleLocator(10))
ax0.yaxis.set_major_formatter(formatter)
ax0.yaxis.set_minor_locator(MultipleLocator(5))

ax0.set_ylabel("Avg. Total Bill($)", fontsize=14)

ax0.grid(axis="y", which="major", color="lightgray")
ax0.grid(axis="y", which="minor", ls=":")

ax0.set_xlabel("Weekday", fontsize=14)
for xtick in ax0.get_xticklabels():
print(xtick)
if xtick.get_text() == h_day:
xtick.set_color("darkred")
xtick.set_fontweight("demibold")
ax0.set_xticklabels(['Thursday', 'Friday', 'Saturday', 'Sunday'], size=12)

ax1 = sns.barplot(x = "day", y = 'total_bill', data = tips,
ci=None, alpha=0.85,
ax=ax[1])
for p in ax1.patches:
height = np.round(p.get_height(), 2)
ax1.text(p.get_x() + p.get_width()/2., height+1, height, ha = 'center', size=12)
ax1.set_ylim(-3, 30)
ax1.set_title("Just Bar Graph")

plt.show()
Text(0, 0, 'Thur')
Text(0, 0, 'Fri')
Text(0, 0, 'Sat')
Text(0, 0, 'Sun')

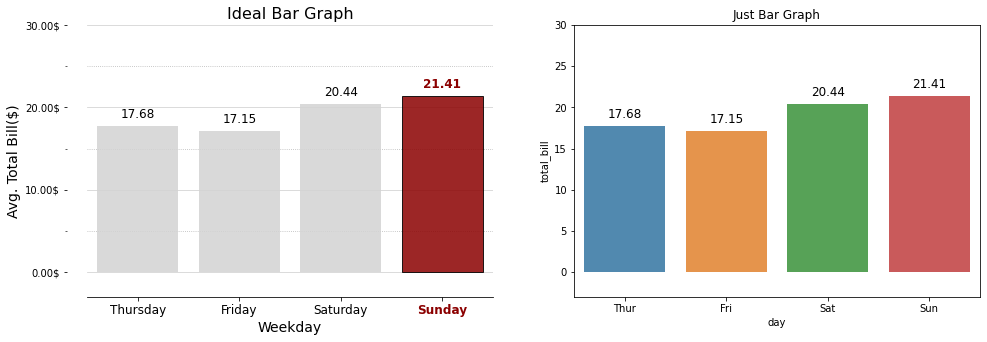
png

pandas 기본 문법

DataFrame 생성 방법


  • list이용

    1
    2
    3
    4
    5

    import pandas as pd

    frame = pd.DataFrame([[1, 2, 3], [4, 5, 6], [7, 8, 9]])
    frame
출력

0 1 2
0 1 2 3
1 4 5 6
2 7 8 9
  • Dictionary 이용

    1
    2
    3
    4
    5
    6
    7
    8
    9
    10
    11
    import pandas as pd

    data = {
    'age' : [20,39,41],
    'height' : [176, 182, 180],
    'weight' : [73, 78, 69]
    }
    indexName = ['사람1', '사람2', '사람3']

    frame = pd.DataFrame(data, index = indexName)
    frame
출력

age height weight
사람1 20 176 73
사람2 39 182 78
사람3 41 180 69

Sample Dataset 가져오기


위처럼 직접 DataFrame을 만드는 것이 아닌 제공하는 Dataset을 직접 가져오는 방법도 있다.
Dataset을 가져오는 방법은 다음과 같다.

  1. Dataset Github에 접속하고 가져오고싶은 데이터셋을 고른다.
  2. 예를들어 flights.csv 를 가져오고 싶다면
    1
    2
    3
    4
    import seaborn as sns
    flights = sns.load_dataset("flights") #여기까지가 가져오기
    flights.head(5) # 다섯번째 행의 데이터까지만 출력
    flights["year"] # 'year'열만 출력
    위와 같이 제공되는 데이터셋을 가져올 수 있다.

DataFrame 조회 방법


기본적인 조회 방법

DataFrame의 기본적인 조회 방법은 다음과 같다.


1
2
# 위에서 가져온 데이터셋 flights를 사용
flights.head() # 데이터프레임의 가장 첫부분부터 표시
출력

year month passengers
0 1949 Jan 112
1 1949 Feb 118
2 1949 Mar 132
3 1949 Apr 129
4 1949 May 121

이 때 .head()의 괄호 안에 숫자가 있다면 그 수의 개수만큼 데이터가 출력된다.

  • .tail()


1
flights.tail() #데이터프레임의 가장 뒷부분부터 표시
출력

year month passengers
139 1960 Aug 606
140 1960 Sep 508
141 1960 Oct 461
142 1960 Nov 390
143 1960 Dec 432

.tail()역시 마찬가지로 괄호안에 숫자가 있다면 수의 개수만큼 데이터가 출력된다.

  • .index


데이터프레임의 인덱스를 표시하는 방법도 있다.

1
flights.index
RangeIndex(start=0, stop=144, step=1)

열(Column) 조회 방법

1
2
3
4
5
6
7
8
9
10
#열(Column) 조회
print ("* 열 조회 - 1")
print (frame['age'])
print ("* 열 조회 - 2")
print(frame.age)

#특정 열의 특정 값을 조회하고 싶을때
print("* 특정 열 의 특정 값 조회")
print(frame['age'][1])
print(frame.height[2])
출력
* 열 조회 - 1
사람1    20
사람2    39
사람3    41
Name: age, dtype: int64
* 열 조회 - 2
사람1    20
사람2    39
사람3    41
Name: age, dtype: int64
* 특정 열 의 특정 값 조회
39
180

행(Row) 조회

행 조회는 열 조회와 조금 다르게 lociloc를 사용해서 조회 할 수 있다.
여기서 loc는 사람이 읽을 수 있는 라벨 값으로 특정 값들을 골라오는 방법이고,
iloc는 행이나 칼럼의 순서를 나타내는 정수로 특정 값을 추출하는 방법이다.

1
2
3
4
5
#행(Row) 조회 (loc)
print("* loc 특정 행 조회")
print(frame.loc['사람1'])

# print(frame.loc[0]) - 조건이 정수이므로 조회 불가
출력
* 특정 행 조회
age        20
height    176
weight     73
Name: 사람1, dtype: int64
loc를 Seq로 조회할 경우
1
2
3
4
5
#행(Row) 조회 (iloc)
print("* iloc 특정 행 조회")
print(frame.iloc[0])

# print(frame.iloc['사람1']) - 조건이 정수가 아니므로 조회 불가
출력
* iloc 특정 행 조회
age        20
height    176
weight     73
Name: 사람1, dtype: int64

DataFrame 수정 방법


열(Column) 추가하기

gender 라는 컬럼을 추가합니다.

1
2
frame_add_col = pd .DataFrame(frame,columns= ['age','height','weight','gender'])
frame_add_col
출력

age height weight gender
사람1 20 176 73 NaN
사람2 39 182 78 NaN
사람3 41 180 69 NaN

컬럼이 추가되었고 어떠한 값도 넣어주지 않았으므로 NaN 값이 출력되고있다.
이제 데이터를 입력해준다.

1
2
frame_add_col['gender'] = ['male', 'male', 'female']
frame_add_col
출력

age height weight gender
사람1 20 176 73 male
사람2 39 182 78 male
사람3 41 180 69 female

행(Row) 추가하기

1
2
3
frame_add_index = frame_add_col.copy()
frame_add_index.loc['사람4'] = [31, 158, 48, 'female']
frame_add_index
출력

age height weight gender
사람1 20 176 73 male
사람2 39 182 78 male
사람3 41 180 69 female
사람4 31 158 48 female

행, 열 삭제하기

drop 메소드를 사용하면 행 또는 열을 삭제할 수 있다.
axis 값은 행이면’0’, 열이면 ‘1’로 지정해주면 된다.

1
2
print('remove age column')
frame_add_col.drop("height", axis=1)
출력
remove age column

age weight gender
사람1 20 73 male
사람2 39 78 male
사람3 41 69 female

그러나 이 경우 기존에 있던 frame_add_col에서 삭제되는게 아니라 삭제된 상태의 프레임을 리턴해준 것이다.
그러므로 기존 프레임에 적용하기 위해서 inplace = True 옵션을 추가로 주어야 한다.

1
2
frame_add_index.drop('사람2', axis=0, inplace = True)
frame_add_index
출력

age height weight gender
사람1 20 176 73 male
사람3 41 180 69 female
사람4 31 158 48 female

References

파이썬(Python) 기본 문법 - 1

이 포스트는 필자의 정확한 파이썬 문법을 익히고 필요할때 찾아보기 위해 서술한 것이다.

Hello World


어떤 프로그래밍언어든 배우기 시작하면 출력하고 보는 Hello world, 파이썬에서는 다음과 같이 출력한다.

1
print("Hello, world!")

Output:

Hello, world!

당연하게도 Hello, world 이외의 다른 문장이 들어가면 그대로 출력되며
print() 에서 괄호 내부에 출력을 해주고싶은 변수나 문장을 입력하면 된다, 문장의 경우는 따옴표로 묶어줘야 출력이 된다.

주석처리


접기 / 펼치기

프로그래밍 언어마다 주석처리를 해주는 방법이 다르다, 파이썬의 경우에는 다음과 같이 주석처리한다.

1
2
3
4
5
6
7
# 한줄을 주석처리하는 방법입니다.
"""
여러줄을
한번에 주석처리하는
방법입니다.
"""
print("Hello, world!")

Output:

Hello, world!

위처럼 작성하고 실행시키면 나머지 줄은 모두 주석처리되고 가장 아랫줄인 Hello, world만 출력이 되는걸 볼 수 있다.

변수의 종류


접기 / 펼치기

변수(Variable)는 (문자나 숫자 같은) 값을 담는 컨테이너로 값을 유지할 필요가 있을 때 사용한다. 여기에 담겨진 값은 다른 값으로 바꿀 수 있다. 변수는 마치 (사람이 쓰는 언어인) 자연어에서 대명사와 비슷한 역할을 한다.

출처 : 생활코딩 - 변수

다른 프로그래밍언어와 같이 파이썬 역시 다양한 변수의 종류(타입)가 있는데 이번 단락에서는 그것에 대해 알아보겠다.

int타입 (정수형)

1
2
num_int = 1
print(type(num_int))

변수에 값을 정수로 주고 그 변수의 타입을 알아본 예제, 출력을 하게되면 <class 'int'>가 줄력된다.

float타입 (실수형)

1
2
num_float = 0.2
print(type(num_float))

변수에 값을 실수로 주고 그 변수의 타입을 출력한 예제, 출력을 하게되면 <class 'float'>가 출력된다.

bool타입 (논리형)

1
2
bool_true = True
print(type(bool_true))

변수에 값을 논리타입(True or False)으로 주고 그 변수의 타입을 출력한 예제, 출력하면 <class 'bool>이 출력된다.

None타입

1
2
none_x = None
print(type(none_x))

Null을 나타내는 자료형이다, None라는 한가지 값만 가질 수 있다. (왜 필요한지는 아직 모르겠다)

사칙연산


접기 / 펼치기

파이썬에서의 사칙연산은 일반적인 사칙연산과 같다.
그리고 나눈후 정수의값만 구하는 //, 나머지를 구하는 %, 거듭제곱을 뜻하는 ** 등의 연산자가 있다.

1
2
3
4
5
6
7
8
9
a = 3
b = 2
print('a + b = ', a+b)
print('a - b = ', a-b)
print('a * b = ', a*b)
print('a / b = ', a/b)
print('a // b = ', a//b)
print('a % b = ', a%b)
print('a ** b = ', a**b)

Output:

a + b =  5
a - b =  1
a * b =  6
a / b =  1.5
a // b =  1
a % b =  1
a ** b =  9

위처럼 각각 계산이 된걸 알 수 있다.

정리하면 아래와 같다

연산자 내용
+ 두 변수의 합을 계산
- 두 변수의 차를 계산
* 두 변수의 곱을 계산
/ 두 변수로 나눈 결과를 float 형으로 반환
// 두 변수로 나눈 결과에서 정수 부분만 취함
% 두 변수로 나눈 결과에서 나머지 값만 가져옴
** i**j일 경우, i의 j만큼 제곱하여 계산 (예: 2 ** 4 = 24 = 16)

논리형 연산자


접기 / 펼치기

논리형 연산자에는 andor이 있다.
and연산자는 두 조건이 모두 참일때 True가 되며 or의 경우 두 조건중 하나라도 참일때 True가 된다.

and연산자

1
2
3
4
print(True and True)
print(True and False)
print(False and True)
print(False and False)

Output:

True
False
False
False

위 결과처럼 두 조건 모두 참일때만 True를 반환한다.
표로 나타내면 다음과 같다.

변수1 변수2 AND 연산결과
True True True
True False False
False True False
False False False

or 연산자

1
2
3
4
print(True or True)
print(True or False)
print(False or True)
print(False or False)

Output:

True
True
True
False

위 결과처럼 두 조건 중 하나만 참이라도 True를 반환한다.
표로 나타내면 다음과 같다.

변수1 변수2 AND 연산결과
True True True
True False True
False True True
False False False

비교 연산자


접기 / 펼치기

비교 연산자에는 >,<,>=,<=이 있다.
일단, 예제를 보자.

1
2
3
4
print(4 > 3)
print(4 < 3)
print(4 >= 3)
print(4 <= 3)

Output:

True
False
True
False

예제처럼 결과는 논리타입으로 출력된다.

문자열 연산


접기 / 펼치기

정수나 실수 논리타입뿐만 아니라 문자열도 연산이 가능하다.
다만 문자열을 뒤에 덧붙이는+연산자, 문자열을 횟수만큼 반복해주는*연산자만 사용이 가능하다.

1
2
3
str1 = "Python "
str2 = "Editor "
print('str1 + str2 = ', str1 + str2)

Output:

Python Editor

+연산자의 경우 위처럼 문자열 두 개가 나란히 이어붙혀져 출력이 되며,

1
2
greet = str1 + str2
print('greet * 3 = ', greet * 3)

Output:

Python Editor Python Editor Python Editor 

*연산자의 경우 변수에 담긴 문자열이 정해준 횟수만큼 반복되어 나열된다.

문자열 인덱싱


접기 / 펼치기

문자열이 있는경우 숫자을 통해 문자열에서 특정 문자만을 출력할 수 있는데 이를 Indexing 이라고 한다.
Hello world이라는 문자열이 있다고 하자 그럼 문자열의 각 인덱스는 다음과 같다.

문자열 H e l l o w o r l d
인덱스 0 1 2 3 4 5 6 7 8 9 10

이처럼 각 글자마다 인덱스가 배정되며 공백에도 인덱스가 배정된다.
인덱스를 사용하면 다음과 같은 것도 가능하다.

1
2
3
4
text_ex = "Hello world"
print(text_ex[2])
print(text_ex[6:10])
print(text_ex[2:11:2])

Output:

l
worl
lowrd

위 예제는 문자열을 담은 변수에 인덱싱을 한 것이다
첫번째 줄은 인덱스’2’의 문자를 가져오는 것인데 인덱스는 0부터 시작하므로 (2번째가아닌)3번째인’l’을 출력한것이다.
두번째 줄은 인덱스’6’부터 ‘9’까지(두번째인덱스-1)의 숫자를 가져오는 것이므로 ‘worl’이 출력되었다.
세번째 줄은 인덱스’2’부터 ‘10’까지를 가져오되, 한칸씩 건너뛰고(세번째 숫자가 3이므로) 가져오는것이다.

리스트(list)


접기 / 펼치기

리스트는 여러개의 문자열, 변수, 숫자 등을 담을수 있는 자료구조이다.
리스트의 장점은 다음과 같다.

  • 인덱스 번호로 빠른 접근이 가능하다.
  • 데이터의 위치에 대해 직접적인 접근(Access)가 가능하다.
    1
    fruit = [['apple', 'banana', 'cherry'], 123]
    위가 리스트의 형태이다.
    리스트의 값은 기본적으로 인덱스가 배정된다 이때는
    1
    print(fruit[0])
    Output: [‘apple’, ‘banana’, ‘cherry’]
    위와 같은 형태로 나타낼 수 있으며 해당 인덱스의 요소가 리스트라면 리스트 전체를 출력한다.

만약 위처럼 리스트가 중첩된 형태라면

1
print(fruit[0][1])

Output:

banana

위처럼 출력이 가능하며 이때 리스트의 요소중 해당 인덱스의 요소가 출력된다.
물론 이 때도 출력된 문자열에서 다음과 같이 문자열의 요소를 출력하는것도 가능하다.

1
print(fruit[0][1][3])

Output:

a

위와같이 결과가 출력된다.

리스트값 수정, 추가, 삭제하기


접기 / 펼치기

리스트가 여러 요소들의 집합이다보니 리스트의 값에 변동이 필요할 때가 있다.
리스트는 값의 수정, 추가, 삭제가 가능하므로 기능과 문법에 대해 알아둘 필요가 있다.

리스트 값 수정하기

1
2
3
a = [0,1,2]
a[1] = "b"
print(a)

Output:

[0, 'b', 2]

별다른 문법없이 리스트의 인덱스에 값을 넣어주니 수정이 되는것을 알 수 있다.

리스트 값 추가하기

  • append

    1
    2
    3
    4
    5
    6
    7
    a = [100, 200, 300]
    a.append(400)
    print(a)

    b = [500,600]
    a.append(b)
    print(a)

    Output:

    [100, 200, 300, 400]
    [100, 200, 300, 400, [500, 600]]
    리스트명.append(값)을 통해서 리스트에 값을 추가할 수 있으며 한개의 값만 추가할 수 있다.
    리스트의 경우엔 한가지 값이며 추가할 경우 중첩된 리스트의 형태로 추가가 된다.

  • extend

    extendappend와 거의 같지만 다른점이 하나 있습니다.
    append는 인자(리스트, 튜플 등)를 주어도 인자 그대로를 리스트에 추가하지만,
    extend는 인자를 줄 경우 인자의 값 하나하나를 리스트에 추가한다.

    1
    2
    3
    4
    a = [2, 9, 3]
    b = [1, 2, 3]
    a.extend(b)
    print(a)

    Output:

    [2, 9, 3, 1, 2, 3]
    결과와 같이 append와 비교했을때 extend된 인자의 값 하나하나가 추가된걸 볼 수 있다.

  • insert

    insert는 입력해준 위치의 인덱스에 값을 추가해준다.

    1
    2
    3
    4
    a = [1,2,3]
    print(a)
    a.insert(1,'abc')
    print(a)

    Output:

    [1,2,3]
    [1,’abc’,2,3]

리스트 값 삭제하기

  • remove

    1
    2
    3
    4
    5
    6
    7
    a =[1,2,1,2]
    #리스트의 첫번째 1이 삭제
    a.remove(1)
    print(a)
    #리스트의 두번째 였던 1이 삭제
    a.remove(3)
    print(a)

    Output:

    [2, 1, 2]
    [2, 2]
    리스트명.remove()는 괄호내의 값을 삭제한다.
    만약 값이 리스트내에서 중복될경우 가장 앞에 있는 값을 삭제한다.

  • del

    1
    2
    3
    4
    5
    6
    7
    8
    9
    10
    a = [0,1,2,3,4,5,6,7,8,9]

    # 1 삭제
    del a[1]
    print(a)

    b = [0,1,2,3,4,5,6,7,8,9]
    # 범위로 삭제
    del b[1:3] #list는 항상 시작하는 index부터, 종료하는 n의 n-1까지의 범위를 잡아준다.
    print(b)

    Output:

    [0, 2, 3, 4, 5, 6, 7, 8, 9]
    [0, 3, 4, 5, 6, 7, 8, 9]
    del 리스트명[인덱스]는 리스트의 인덱스에 위치한 값을 삭제해준다.
    인덱스값에 범위를 주고싶다면 0:4 처럼 넣을수 있으며 이때는 0에서 3번째 값까지 삭제가 된다.

  • pop

    1
    2
    3
    4
    5
    a = [0,1,2,3,4]
    r = a.pop(1)

    print(a)
    print(r)

    Output:

    [0, 2, 3, 4]
    1
    리스트명.pop()은 괄호내의 값을 해당 리스트에서 끄집어낸다.

튜플(tuple)


접기 / 펼치기

튜플은 리스트와 비슷하게 여러개의 문자열, 변수, 숫자 등을 담을수 있는 자료구조이다.
튜플과 리스트의 가장 차이점으로는 튜플은 값에대한 수정이 불가하다는 점이다.
그렇다면 튜플은 무슨 장점이 있느냐 라고 반문할 수 있는데 리스트와 비교한 튜플의 장점은 다음과 같다.

  • 메모리 사용량이 적다.
  • 생성 시간이 빠르다.
  • 인덱스를 사용하여 튜플의 데이터에 접근하는 시간이 비교적 짧다.

튜플의 문법, 기본형태는 다음과 같다.

1
2
3
4
5
6
7
8
9
10
11
tuple1 = (0) # 끝에 콤마(,)를 붙이지 않았을 때
tuple2 = (0,) # 끝에 콤마(,)를 붙여줬을 때
tuple3 = 0,1,2

print(tuple1)
print(tuple2)
print(tuple3)

print(type(tuple1)) # 콤마(,)를 붙여주지 않으면 튜플이 아닙니다.
print(type(tuple2)) # 콤마(,)를 붙여주어야 튜플 자료형 입니다.
print(type(tuple3)) # 여러개의 값 일경우 괄호를 없애주어도 튜플 자료형 입니다.

Output:

0
(0,)
(0, 1, 2)
<class 'int'>
<class 'tuple'>
<class 'tuple'>

튜플을 생성할때 튜플이 되기위해서는 콤마(,)가 필수적이다.
콤마를 작성하지 않으면 타입을 출력했을때 튜플이 아닌 입력한 변수형태로 출력이 된다.

튜플역시 리스트와 같이 인덱싱및 슬라이싱이 가능하다.

튜플의 연산

튜플도 연산이 가능한데, 더하거나 곱하는 +, * 연산자만 사용이 가능하다.

1
2
3
4
t1 = (0,1,2,3,4)
t2 = ('a','b','c')
t3 = t1+t2
print(t3)

Output:

(0, 1, 2, 3, 4, 'a', 'b', 'c')

딕셔너리


접기 / 펼치기

딕셔너리는 키와 그에따른 값으로 구성되어있는 파이썬의 자료구조이다.

1
2
3
4
5
dic = {'teacher':'alice', 'class': 5, 'studentid': '15', 'list':[1,2,3]}

print(dic['teacher'])
print(dic['class'])
print(dic['list'])

Output:

alice
5
[1, 2, 3]

를 출력하면 그와 대응하는 이 출력되는 자료구조이며 자료에 순서가 없는논시퀀스 자료형이다.

1
2
3
a = {'name': 'bob', 'job': 'farmer', 'age': 35}
a.keys()
a.values()

Output:

dict_keys(['name', 'job', 'age'])
dict_values(['bob', 'farmer', 35])

이렇게 키만 출력할수도, 값만 출력할수도 있다.

집합 연산자


접기 / 펼치기

파이썬에도 집합연산이 있고, 자료구조들의 합,교,차집합에 대한 연산을 할수 있다.
기호는 |,&,-이며, 각각의 예시는 다음과 같다.

1
2
3
4
5
a = {1,2,3,4}
b = {3,4,5,6}
print(a|b)
print(a&b)
print(a-b)

Output:

{1, 2, 3, 4, 5, 6}
{3, 4}
{1, 2}

if 조건문


접기 / 펼치기

조건문이란 작성자가 명시한 조건식의 결과인 boolean값이 참인지 거짓인지에 따라 달라지는 계산이나 상황을 수행하는 문장이다.

1
2
3
4
5
6
7
8
9
10
a = -5

if a>5:
print('a는 5이상입니다')

elif a > 0:
print("a는 0초과, 5이하입니다")

else:
print("a는 음수입니다")

Output:

a는 음수입니다.

조건식에는 기본적으로 조건식이 들어가지만 TrueFalse등의 직접적인 bool형 변수가 삽입될수도 있으며, and,or 등과 결합하여 여러가지의 조건식을 사용할수도 있다.

반복문 (for,while)


접기 / 펼치기

같은동작을 여러번 반복해야 할 때 같은코드를 여러번 적어넣는건 비효율적이다.
그럴때 반복문을 사용하면 훨씬 적은양의 코드로도 같은효과를 낼 수 있다.

  • for문

  • for문의 기본 구조
    1
    2
    3
    for 변수 in 리스트(또는 튜플, 문자열) :
    수행할 문장1
    수행할 문장2
    리스트나 튜플, 문자열의 첫 번째 요소부터 마지막 요소까지 차례로 변수에 대입되어 “수행할 문장1”, “수행할 문장2” 등이 수행된다.
    1
    2
    3
    a = ['1','2','3']
    for i in a :
    print(i)
    Output: 1
    2
    3

리스트 a의 첫번째 값인 1이 i에 대입되고 print(i)가 출력된다.
다음엔 두번째 값인 2가 대입되고 출력된다.
이것을 마지막 값까지 반복한다.

  • while문

  • while문의 기본 구조
    1
    2
    3
    4
    5
    while <조건문>:
    <수행할 문장1>
    <수행할 문장2>
    <수행할 문장3>
    ...
    while문은 for보다는 간단하다. while, 조건문, 실행문 이 세개면 완성되기 때문이다.
    이러한 특성때문에 while문은 조건문을 거짓으로 만들어주는 문장이 없다면 무한실행된다. 프로그램 뻗는다
    간단한 예제를 보면 다음과 같다.
    1
    2
    3
    4
    i = 0
    while i <= 5 :
    print("{}번째 반복입니다.".format(i))
    i += 1
    Output: 0번째 반복입니다.
    1번째 반복입니다.
    2번째 반복입니다.
    3번째 반복입니다.
    4번째 반복입니다.
    5번째 반복입니다.
    변수 i로 인해 자동으로 조건식이 False가 되면서 while문이 종료되는 모습이다.
    이렇듯 while문은 조건문을 거짓으로 만들어주는 무엇인가가 없다면 종료되지않는다.